
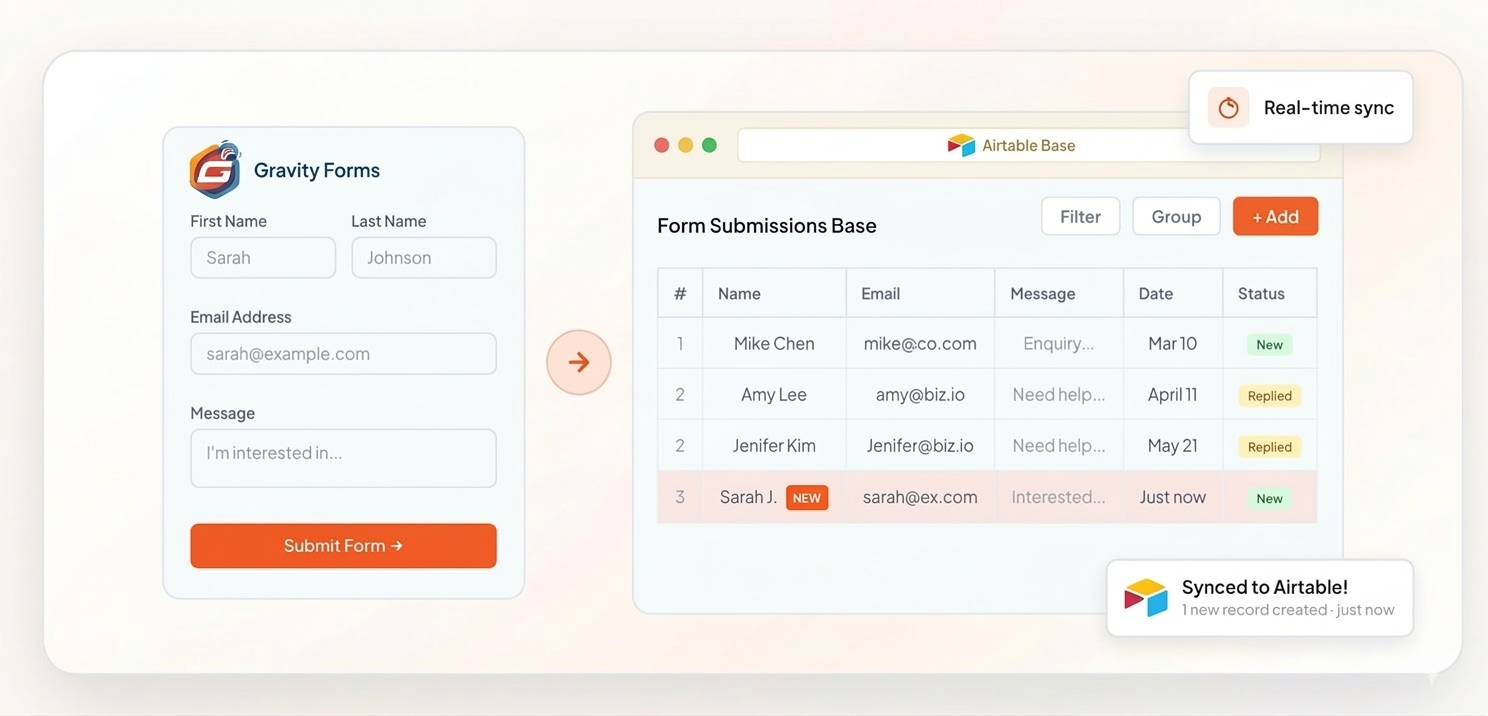
If you're trying to connect Gravity Forms to Airtable — whether you want to sync contact forms in real time, send checkbox selections to a structured database, or build an automated pipeline from your WordPress forms — this is the complete guide. It covers the direct integration without Zapier, the Zapier method with its real costs, and every field type Gravity Forms can throw at Airtable.
The frustrating reality is that Gravity Forms has no native Airtable feed. Every workaround users find — linking Gravity Forms with Airtable through Zapier, using the Webhooks add-on, or writing custom code — comes with meaningful trade-offs: cost, complexity, or both. This guide walks you through the approach that sidesteps all of them.
Why Linking Gravity Forms with Airtable Isn't Straightforward
Gravity Forms is the developer's and agency's form builder of choice — built for complex WordPress applications with its powerful Add-On Framework, conditional logic routing, multi-page workflows, and unique field types like the List field. Every Gravity Forms license is paid (starting at $59/year — there is no free tier), so users understandably expect a rich integration ecosystem.
The Add-On Framework delivers 40+ feeds: Mailchimp, HubSpot, Salesforce, ActiveCampaign, Stripe, PayPal, Slack, and more. Airtable is not on that list. When users discover this, two workarounds appear — and both have significant friction:
- Gravity Forms Webhooks Add-On → Zapier → Airtable — The Webhooks add-on sends a raw POST payload to a URL. It requires the Elite license ($259/year) — not available on Basic ($59) or Pro ($159). Even with it, the webhook sends unstructured data that Airtable's API doesn't accept directly. Zapier ($20–49+/month) must sit in the middle to parse and reformat the payload. Two paid subscriptions, two dashboards, data routed through a third-party server.
- Custom PHP code using
gform_after_submission— Gravity Forms developers often write a custom function that hooks into the form submission and calls Airtable's API directly. This works, but requires writing and maintaining PHP, handling API authentication manually, and rebuilding retry logic from scratch.
The Webhooks add-on is gated behind the Elite license ($259/year). If you're on Gravity Forms Basic ($59/yr) or Pro ($159/yr), the Webhooks add-on is unavailable — meaning the Zapier path requires upgrading your entire Gravity Forms license first, then adding a Zapier account on top.
Integration for Airtable uses gform_after_submission directly — a core Gravity Forms hook available on all license tiers. No Elite upgrade, no Webhooks add-on, no Zapier account needed.
What You Need to Connect Gravity Forms to Airtable
- WordPress with Gravity Forms installed (Basic, Pro, or Elite — all tiers work)
- An Airtable account (the free tier is sufficient to get started)
- The Integration for Airtable plugin — free on WordPress.org, no account required
- An Airtable Personal Access Token — takes about 2 minutes to create
- An Airtable base with a table ready to receive your Gravity Forms entries
How to Connect Gravity Forms to Airtable — Step-by-Step
Follow these six steps to set up your Gravity Forms to Airtable integration and start syncing entries automatically. The full process takes about 15 minutes.
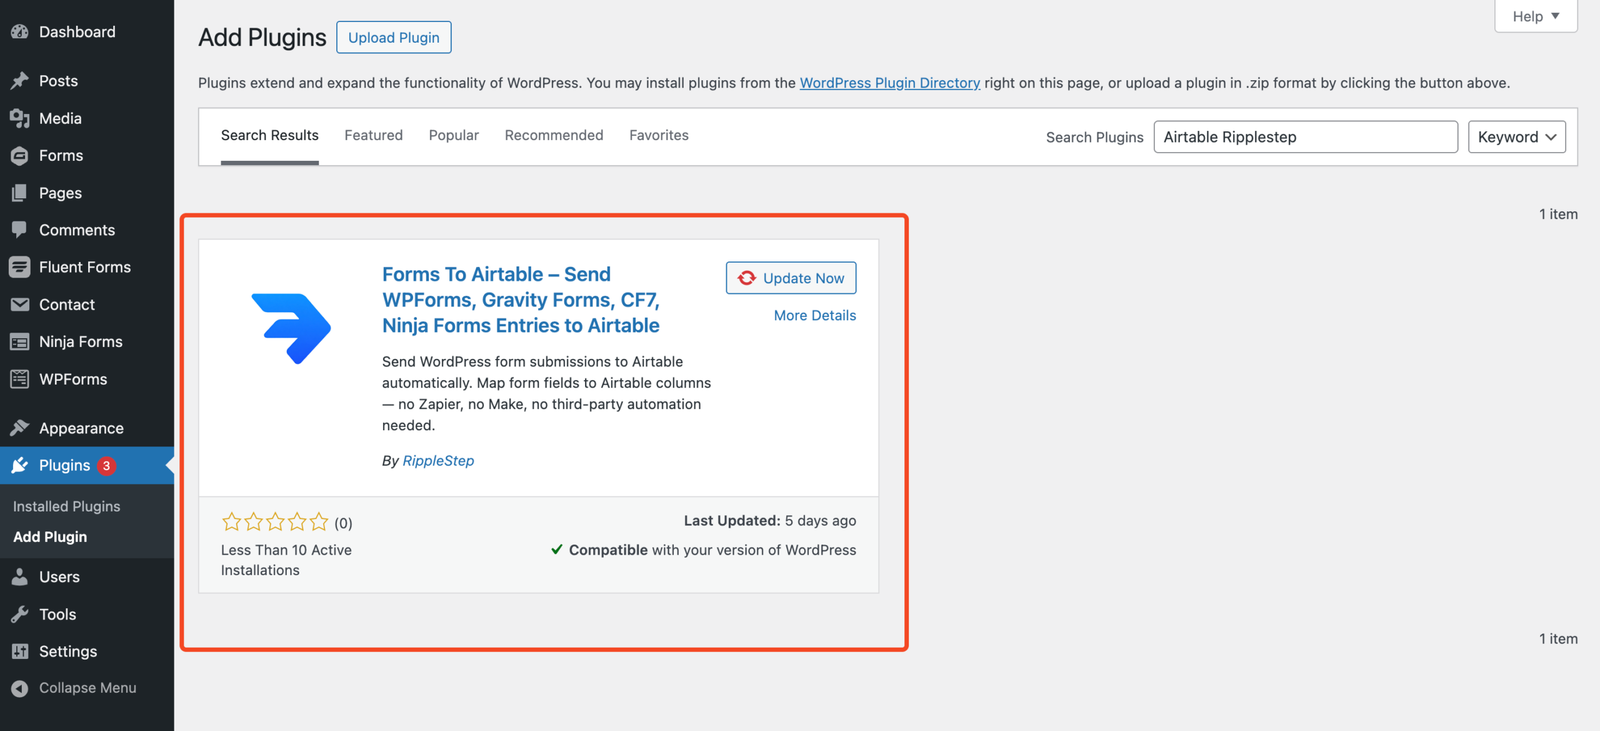
In your WordPress dashboard, go to Plugins → Add New. Search for "Airtable RippleStep". Click Install Now, then Activate. A new Forms to Airtable menu item will appear in your sidebar. Gravity Forms does not need any reconfiguration — the plugin detects it automatically and reads your forms and fields independently.
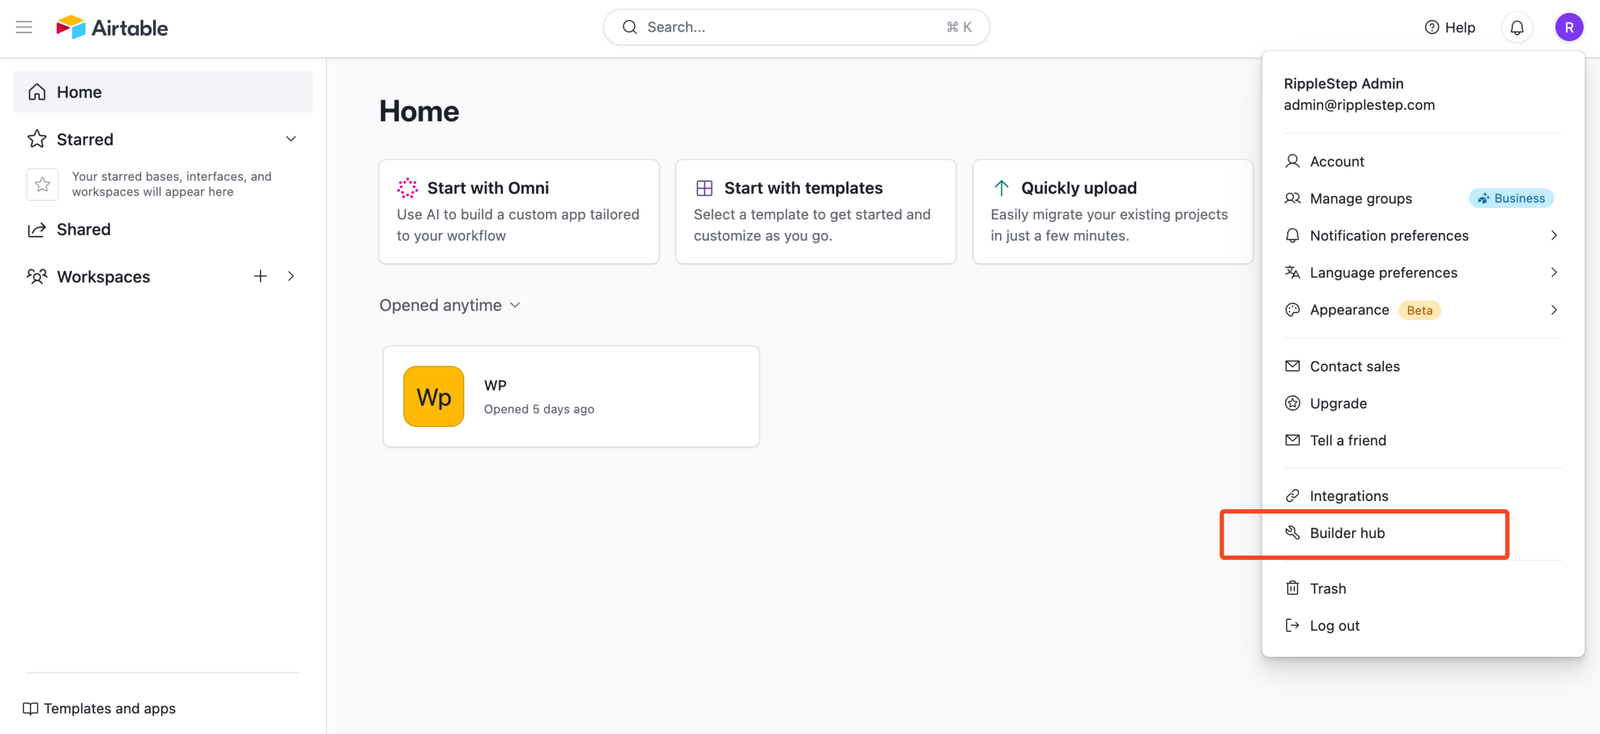
2.1 Open Personal access tokens
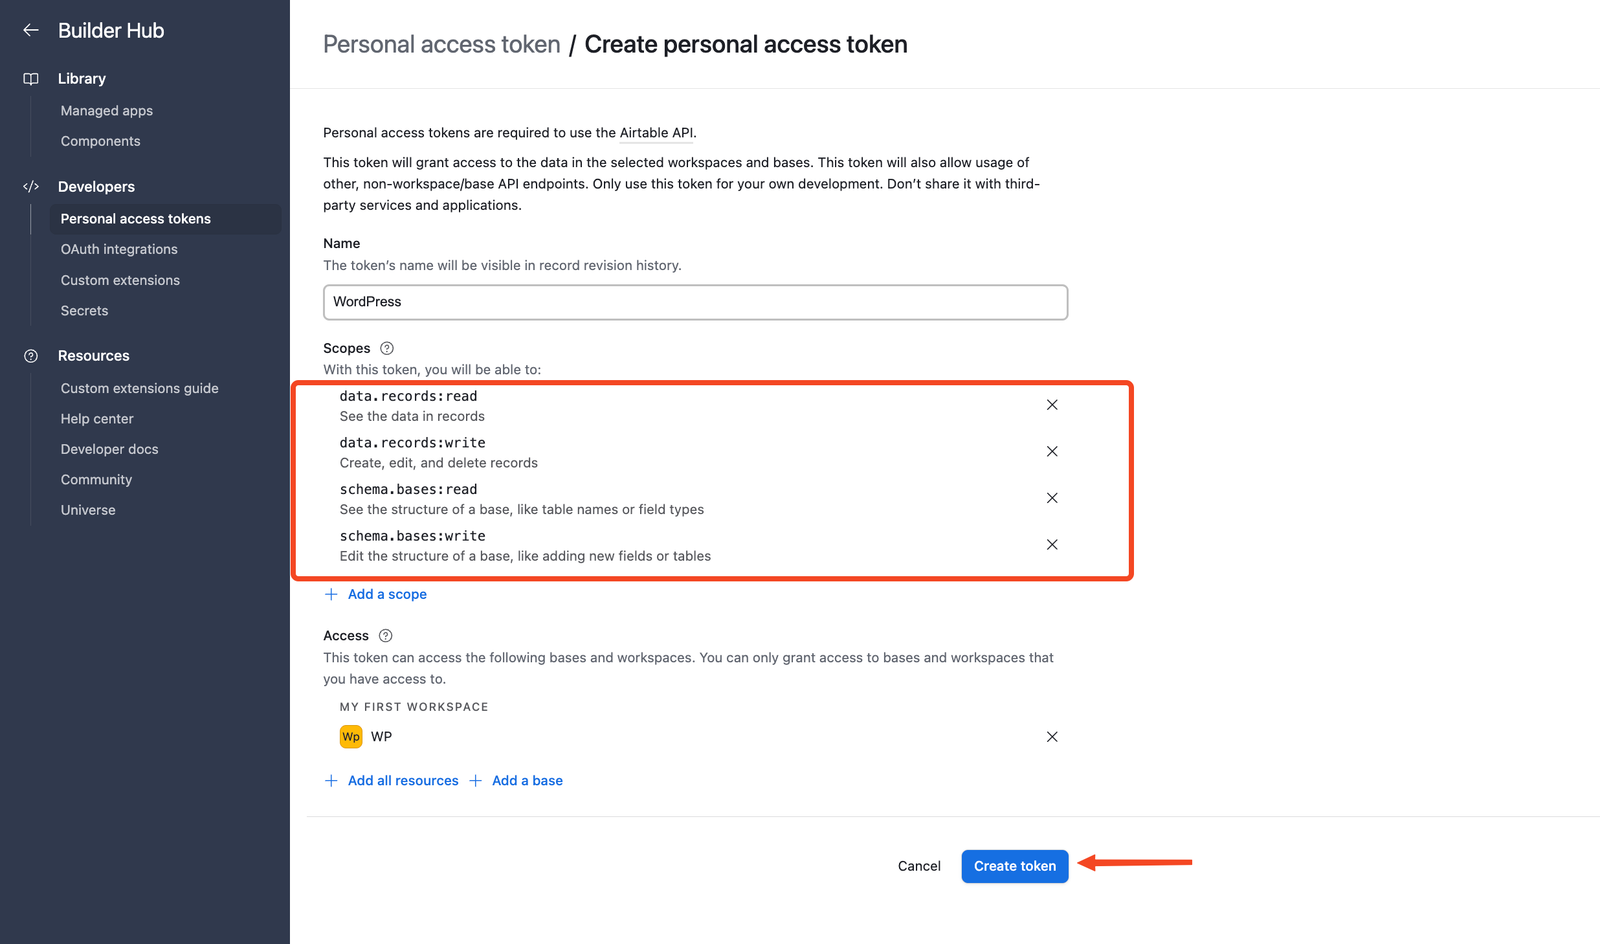
Log into Airtable, click your avatar → Account. In the left sidebar open Builders hub → Personal access tokens, or go directly to airtable.com/create/tokens.
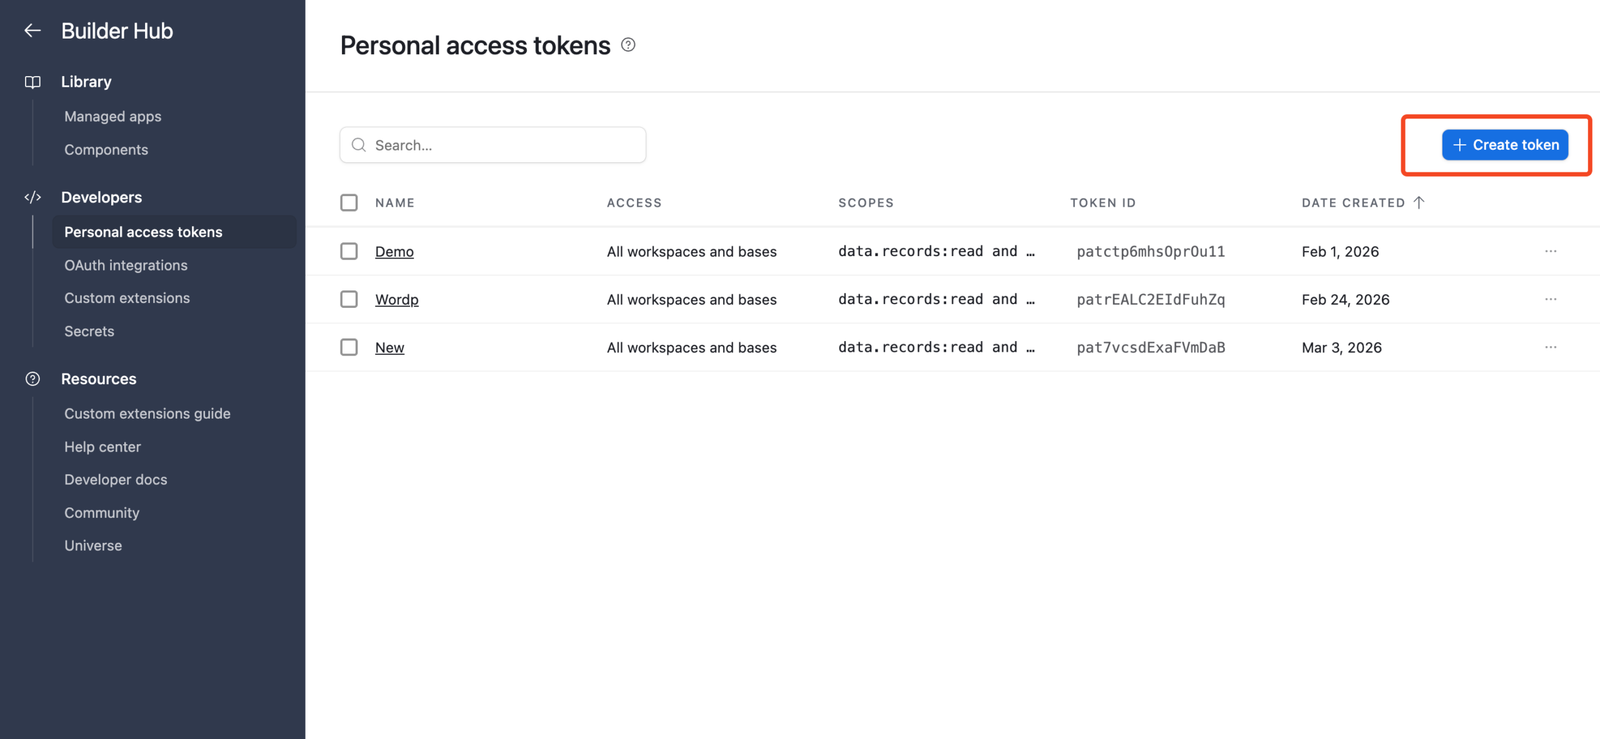
2.2 Create and name the token
Click + Create new token. Name it something recognizable like "WordPress Gravity Forms" so you can identify it later.
2.3 Set scopes and bases
Select all four required scopes:
schema.bases:read— read your base and table structureschema.bases:write— create and modify tables and columnsdata.records:read— read existing recordsdata.records:write— create new records from Gravity Forms entries
Under Access, select the Airtable base receiving your form data. Click Create token and copy it immediately — Airtable only shows it once.
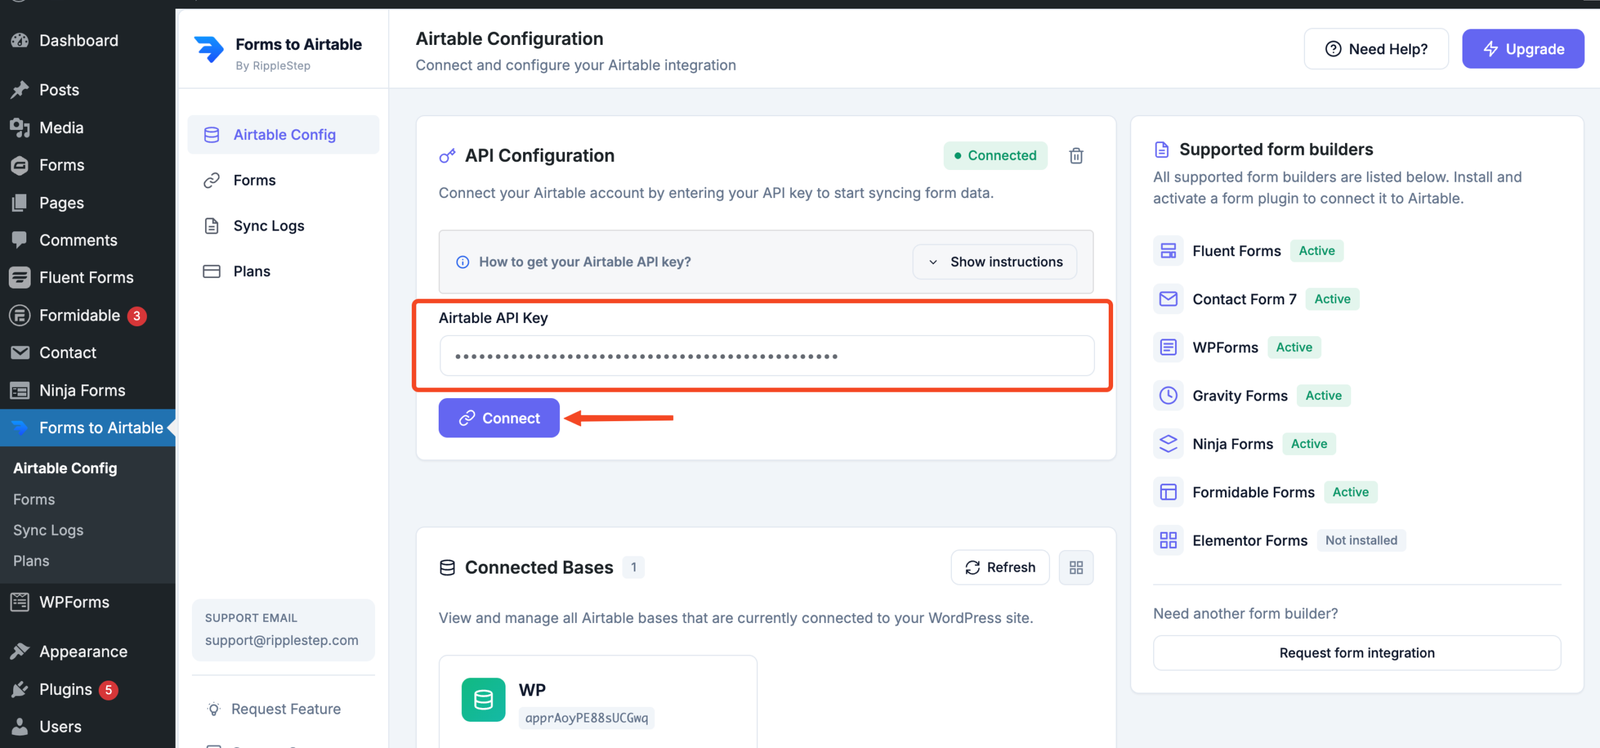
In WordPress, go to Forms to Airtable → Airtable Config. Paste your Personal Access Token and click Save & Verify. The plugin confirms the connection and loads your Airtable bases. If verification fails, confirm the token has all four scopes and access to your target base.
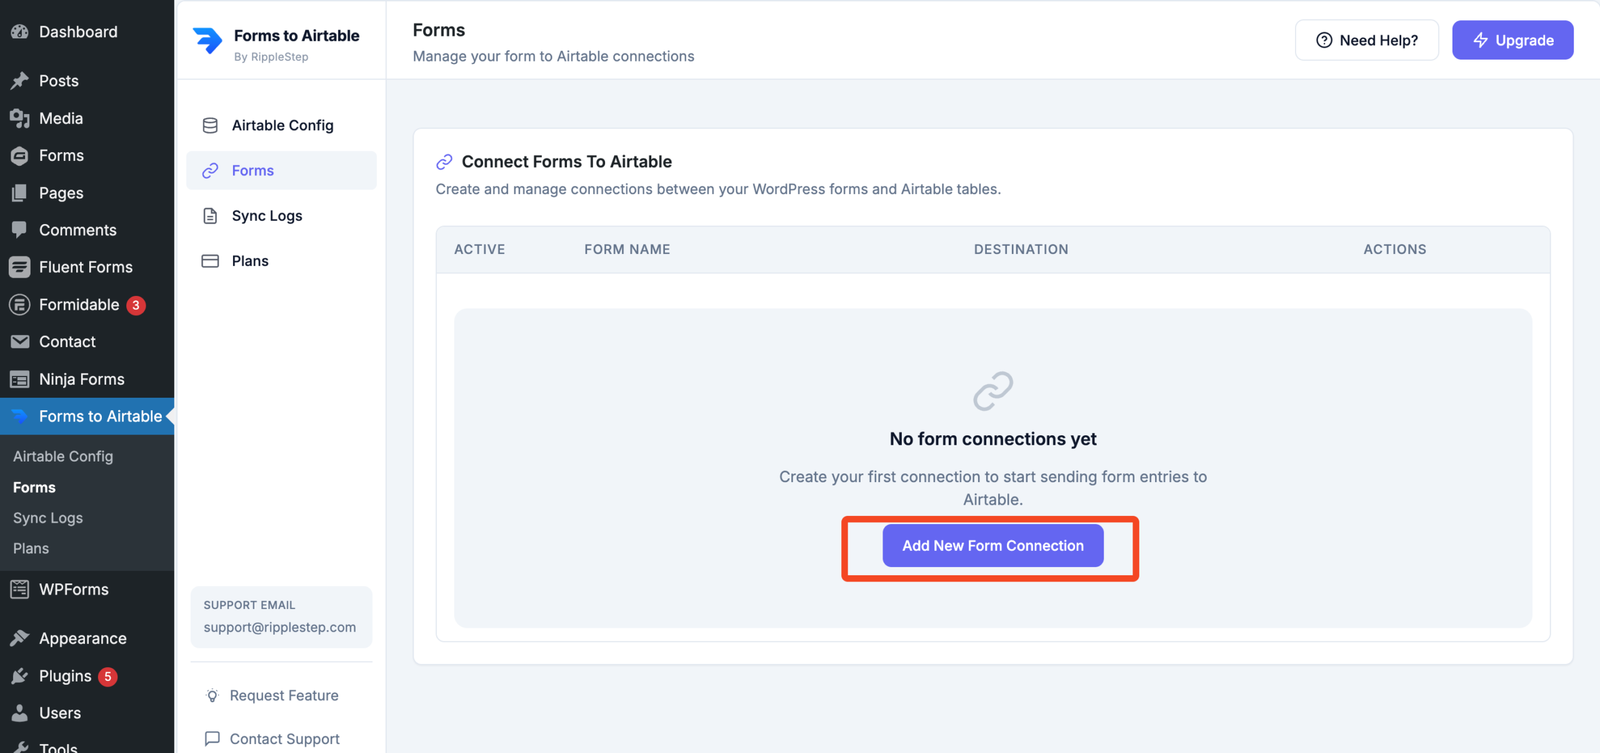
4.1 Open the connection wizard
Go to Forms to Airtable → Forms and click Create new form connection.
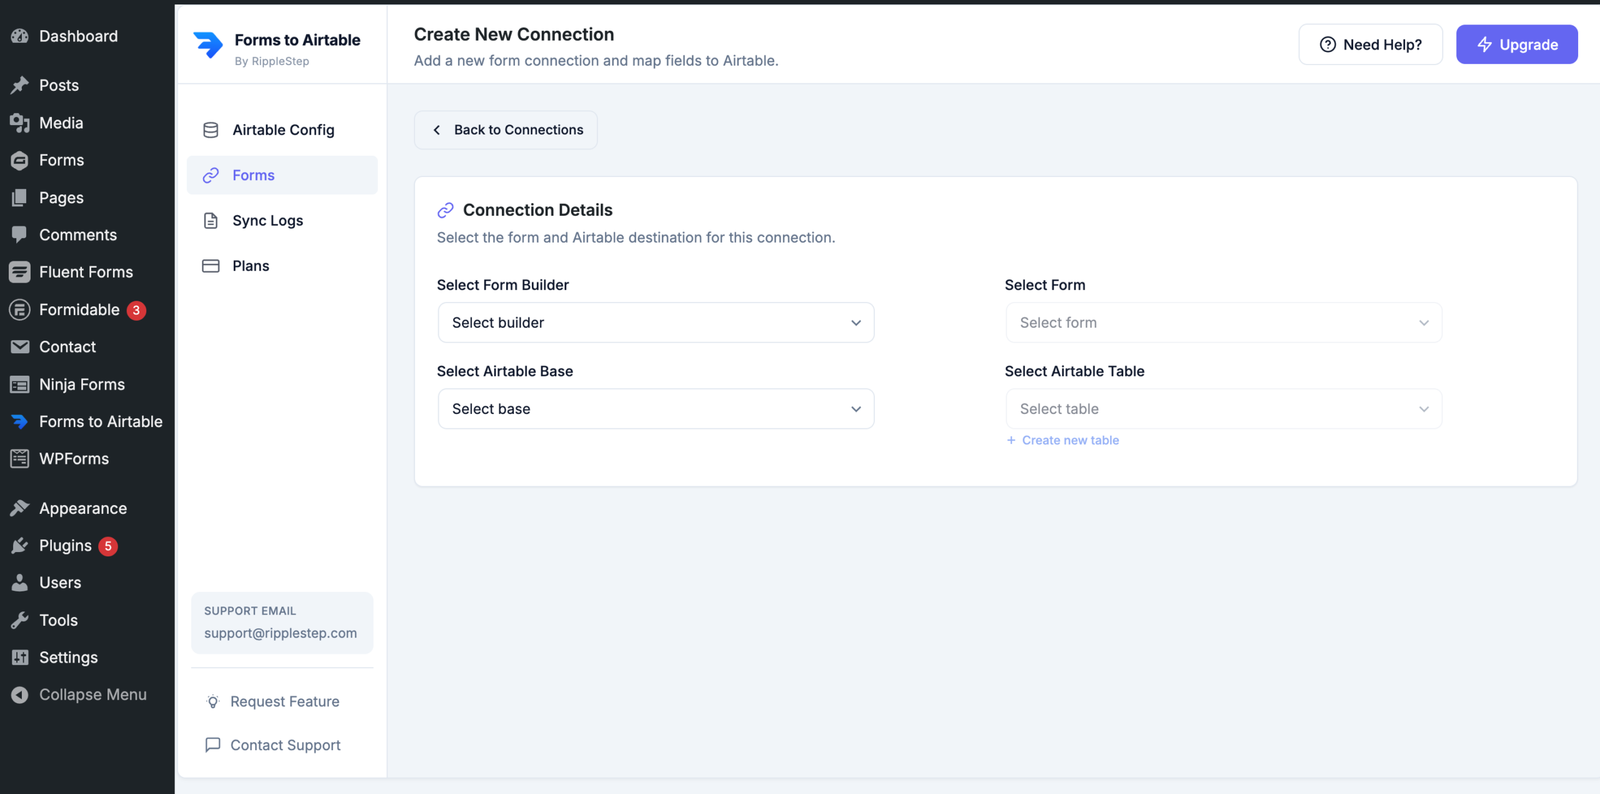
4.2 Select your form and target table
Set Form builder to Gravity Forms. The plugin lists every Gravity Forms form on your site — multi-page forms, checkbox-heavy forms, payment forms, everything. Select your form, choose your Airtable base and table. You can also create a new Airtable table directly from the plugin — it auto-generates columns from your Gravity Forms field labels.
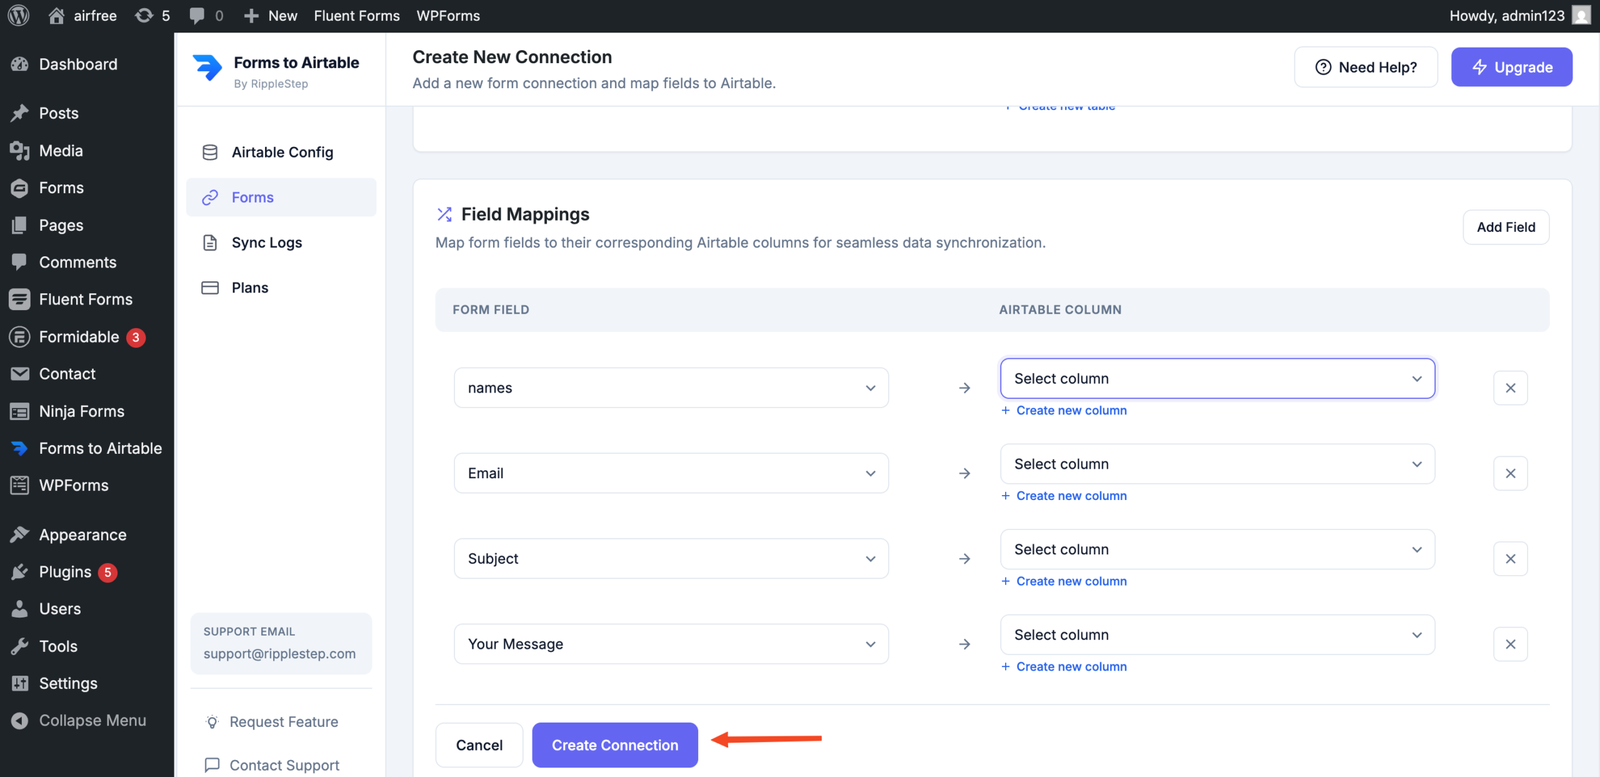
The field mapper lists every Gravity Forms field in the left dropdown. For each field you want in Airtable, select the matching Airtable column in the right dropdown. For checkbox fields, map to a Single line text column — multiple selections arrive as a comma-separated string (e.g. Option A, Option B). Click Save Connection when complete.
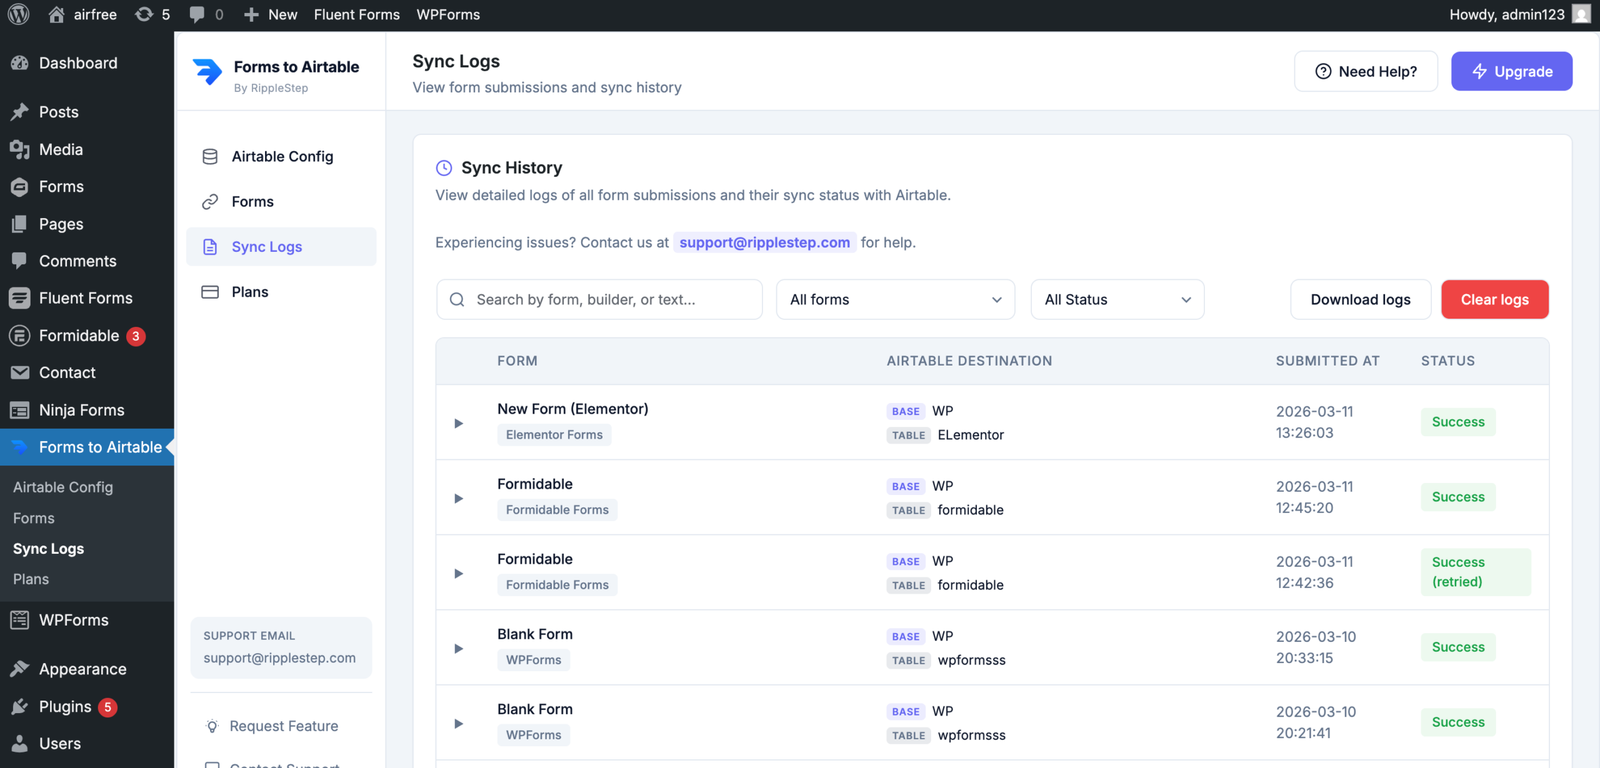
Submit your Gravity Forms form with test data. Open Integration for Airtable → Logs and confirm a success entry appears within seconds. Then open your Airtable table and verify the record is there with all expected field values correctly mapped.
If you hit any hurdle during installation, token setup, or field mapping — especially with checkbox or List fields — you can reach us directly for help.
Email support@ripplestep.com with a short description of the issue (and screenshots if possible), and we'll walk you through the fix.
Zapier Gravity Forms to Airtable vs. Direct Integration — Full Comparison
Searching for zapier gravity forms to airtable is common — Zapier is many users' first instinct for connecting two tools. Here's the honest comparison between the Zapier path and the direct plugin approach, including the hidden costs of the Zapier route:
| Feature | Integration for Airtable Plugin | Gravity Forms Webhooks + Zapier | Custom gform_after_submission Code |
|---|---|---|---|
| Gravity Forms license required | ✓ Any tier — Basic, Pro, Elite | ✗ Elite only for Webhooks add-on | ✓ Any tier |
| Annual cost | Free / $99/yr Pro plugin | Elite upgrade + Zapier $240+/yr | Developer time to build & maintain |
| Direct API — no relay server | ✓ WordPress → Airtable direct | ✗ Routes via Zapier servers | ✓ Direct if coded correctly |
| Checkbox data handling | ✓ Comma-separated automatically | Raw serialized — requires Zapier parsing step | Depends on implementation |
| List field support | ✓ Formatted automatically | Raw serialized PHP — unusable without parsing | Must write custom parsing |
| Field mapping UI | ✓ Visual dropdowns in WordPress | ✗ Manual field mapping in Zapier | ✗ Hard-coded in PHP |
| Real-time sync | ✓ Seconds | Up to 15 min delay on Zapier free tier | ✓ Immediate |
| Sync logs in WordPress | ✓ Built-in Logs tab | ✗ Logs in Zapier (separate dashboard) | ✗ Must build logging yourself |
| Retry on failure | ✓ Automatic retry (Pro plugin) | ✓ Manual replay in Zapier | ✗ Must build retry logic |
The key takeaway: the Zapier path for Gravity Forms is significantly more expensive and more complex than it appears at first glance — especially because of the Elite license requirement for the Webhooks add-on. Users on Gravity Forms Basic or Pro have no Zapier path at all without upgrading their entire Gravity Forms license.
Gravity Forms to Airtable Integrations — Real-World Use Cases
Complex applications → Airtable pipeline
Multi-page grant applications, membership applications, or compliance forms sync as complete entries — every page's fields in one Airtable record, ready for review workflows.
Checkbox survey → segmented analysis
Respondents' multiple-choice selections (e.g., "Which services interest you?") arrive comma-separated in Airtable. Use FIND() formulas or grouped views to segment by selection.
Client intake → project records
Agency client intake forms with checkbox service selections, List field deliverables, and conditional logic questions all sync into a structured Airtable project base.
List field submissions → inventory
Forms with List fields collecting multiple line items (products, SKUs, equipment) sync their row data to Airtable for inventory, quoting, or order tracking.
Payment orders → revenue database
Gravity Forms Stripe and PayPal payment entries sync amount, status, and transaction ID to Airtable — building a real-time revenue tracking table automatically.
Job applications → hiring pipeline
Application forms with checkbox skill selections, file upload résumés, and multi-page logic feed Airtable Kanban views — candidates progressing from Applied to Offer without leaving Airtable.
Free vs Pro Plugin Plans
The free plan covers a single Gravity Forms → Airtable connection — enough to test the integration and validate your field mapping, including checkbox fields.
Starter
Test your Gravity Forms → Airtable connection on any license tier — including checkbox and List field mapping.
- 1 active form connection
- Up to 300 syncs / month
- All field types including checkboxes
- List field support
- Sync logs
Troubleshooting Gravity Forms Airtable Sync Issues
Open Forms to Airtable → Logs and read the error message. Most common cause: the Personal Access Token is missing the data.records:write scope, or the token doesn't have access to the target base. Edit the token in Airtable → Builders hub → Personal access tokens, add the missing scope or base, then click Save & Verify in the plugin's Airtable Config tab.
Verify the Airtable column type is Single line text or Long text — not Number or Date, which will reject the comma-separated string value. Also confirm the checkbox field is mapped (not left unmapped) in the field mapper. Submit a new test entry after correcting the column type.
The default behavior is to combine all selected values with a comma separator. To get individual columns per checkbox option, re-open the field connection and map each checkbox sub-choice individually to its own Airtable column. The mapper exposes sub-fields like "Checkbox: Email", "Checkbox: Phone" separately for this purpose.
List field data must go into an Airtable Long text column — not Single line text. If the column type is Single line text, Airtable may truncate or reject the multi-line value. Change the column type to Long text in Airtable, then resubmit a test entry.
Gravity Forms' Save and Continue Later feature stores a draft entry but does not fire gform_after_submission. The sync only triggers on complete final submission. This is by design — it prevents incomplete records in Airtable. The entry will sync when the user returns and completes the final page.
The form must be saved in the Gravity Forms editor before the plugin can read updated field lists. Open Gravity Forms → your form → click Update. Then re-open the connection and the new field should appear. This applies after adding new fields or checkbox options to an existing form.
The Personal Access Token may not have access to the target base. In Airtable, go to Builders hub → Personal access tokens, edit the token, confirm your base is listed under Access, save, then re-verify the token in the plugin's Airtable Config tab.
Frequently Asked Questions — Gravity Forms Airtable Integration
These questions are phrased exactly as people search for them — so you'll find answers to every variation of this topic here.
Install the free Integration for Airtable plugin from WordPress.org, connect it to your Airtable account with a Personal Access Token, create a form connection with Gravity Forms as the builder, map your fields (including checkboxes and List fields) to Airtable columns, and every new submission will sync to Airtable automatically within seconds. The full setup takes about 15 minutes and works on all Gravity Forms license tiers.
Yes. Integration for Airtable connects Gravity Forms directly to Airtable's API — no Zapier account, no relay server, and no Elite license required. The plugin uses the gform_after_submission core hook available on Basic, Pro, and Elite Gravity Forms licenses.
In the Integration for Airtable field mapper, select your Gravity Forms Checkbox field and map it to an Airtable Single line text or Long text column. Multiple selections are automatically joined with a comma separator — if a user checks three options, Airtable receives "Option A, Option B, Option C" in one cell. To map each checkbox option to its own column, use the individual sub-field mapping options in the mapper instead.
Open your form connection in the plugin and find the Checkbox field in the left dropdown of the field mapper. You have two approaches: (1) Map the whole field to a Single line text column — all selected values arrive comma-separated. (2) Map each checkbox sub-choice individually to its own Airtable column — useful when you need to filter or group by specific checkbox options. Both approaches are available in the mapper dropdown.
When a Gravity Forms Checkbox field has multiple selections, the values are joined with a comma separator before being sent to Airtable. For example, selecting "Email", "Phone", and "SMS" results in the Airtable cell containing: Email, Phone, SMS. This is the default separator and cannot be changed at the plugin level. If you need a different separator in your Airtable view, use an Airtable formula: SUBSTITUTE({Field}, ", ", " | ") to replace the comma with any separator you prefer.
No. Gravity Forms' Add-On Framework includes feeds for Mailchimp, HubSpot, Salesforce, Stripe, Slack, and 40+ other platforms — but not Airtable. There is no official Gravity Forms Airtable add-on or feed. A third-party plugin like Integration for Airtable is required to link Gravity Forms with Airtable.
To use Zapier with Gravity Forms you need: (1) A Gravity Forms Elite license ($259/year) — the Webhooks add-on required for Zapier is Elite-only. (2) A paid Zapier account ($20+/month). In Gravity Forms, create a Webhook feed pointing to Zapier's webhook catch URL. In Zapier, set up a Zap with "Webhooks by Zapier" as the trigger and "Airtable — Create Record" as the action, then manually map each field. Note that Gravity Forms Webhook payloads include raw serialized data for checkbox and List fields — you'll need additional Zapier steps to parse them correctly. The direct plugin approach handles all of this automatically.
Yes. Integration for Airtable uses gform_after_submission — a core Gravity Forms action hook that fires on all license tiers. Gravity Forms Basic ($59/yr) and Pro ($159/yr) users can connect to Airtable directly without upgrading to Elite. This is the main advantage over the Zapier webhook path, which requires Elite.
Pour connecter Gravity Forms à Airtable, installez gratuitement le plugin Integration for Airtable depuis WordPress.org. Créez un Personal Access Token dans Airtable (Builders hub → Personal access tokens), collez-le dans le plugin (Forms to Airtable → Airtable Config), puis créez une connexion de formulaire en choisissant Gravity Forms. Mappez vos champs — y compris les champs à cases à cocher — aux colonnes Airtable et chaque soumission sera synchronisée automatiquement. La configuration prend environ 15 minutes et fonctionne avec toutes les licences Gravity Forms (Basic, Pro, Elite).
Yes — and it's a live sync, not a manual export. Instead of exporting a CSV from Gravity Forms and importing it into Airtable, Integration for Airtable sends each entry to Airtable in real time as soon as the form is submitted. No scheduled exports, no CSV formatting problems, no manual intervention. The Airtable table is always up to date with your latest Gravity Forms submissions.
Yes. When a Gravity Forms user checks multiple options, all selected values are collected and sent to Airtable as a comma-separated string in a single cell. For example, checking three options results in: "Choice 1, Choice 2, Choice 3". You can then use Airtable formulas to split, reformat, or filter this value. If you need individual columns per checkbox choice, the plugin also lets you map each checkbox sub-field to its own Airtable column.
No. Gravity Forms' Save and Continue feature saves a draft without firing gform_after_submission. The Airtable sync only triggers on complete, final form submission. This is intentional — it prevents partial entries with empty required fields from creating incomplete records in Airtable. The sync will fire when the user returns and submits the final page.
Gravity Forms Airtable Automation Ideas
Once Gravity Forms entries — including their checkbox selections, List field data, and payment information — land in Airtable automatically, you can build powerful workflows entirely inside Airtable:
- Checkbox segmentation → automated routing: Use an Airtable Automation triggered on record creation to read the comma-separated checkbox column (e.g., "Which services interest you?") with a FIND() check. If "Enterprise" is found, update a Priority field to "High" and assign the record to your enterprise sales rep automatically.
- Application review pipeline: Airtable Kanban view on your applications table — team members drag cards from Applied → Reviewing → Shortlisted → Offer. When Status changes to "Shortlisted", an Airtable Automation sends the candidate a personalized email referencing their checkbox selections (e.g., "We noted your interest in X and Y").
- Checkbox → Multiple select conversion: Airtable Automation script action — on record creation, parse the comma-separated checkbox string and populate a Multiple select column with individual tags for each selected value. Now you can filter and group by individual checkbox options in Airtable views.
- List field rows → child records: Airtable Automation script — when a new entry arrives with List field data, split the line-separated values and create individual linked records in a child table. One form submission becomes multiple structured Airtable records.
- Payment tracking dashboard: SUM summary field on the Payment Amount column — auto-calculates total revenue from all Gravity Forms payment entries per week or month. Grouped by Payment Status to separate paid, pending, and failed.
- International / multi-language forms: Gravity Forms supports multilingual forms via WPML or TranslatePress. Form submissions in any language sync to Airtable identically — field values arrive in whatever language the user submitted, and Airtable views can be filtered by a Language column if you add one as a hidden field in your form.
Ready to connect Gravity Forms to Airtable?
The free plugin works on all license tiers — checkbox mapping, List fields, multi-page forms, payment entries. No Elite license, no Zapier, no relay servers.
Install Forms to Airtable Free →