
Product documentation has a dual audience: internal team members who write, review, and maintain it, and external users who need to find answers quickly. Most teams handle this by writing in one tool and publishing in another — manually. The result is docs that drift out of sync, a support team answering the same questions over and over, and a public documentation site that's perpetually six weeks behind the actual product.
The better setup: write once in Confluence, publish automatically to WordPress. Your technical writers and product managers stay in the tool they already use. Your users get a fast, branded, searchable documentation site on your own domain. And when a doc changes, your website reflects it — no manual republishing required.
"We used to maintain two versions of every doc — one in Confluence for the team and one on our website. That ended the day we set up the sync. Now there's one version, and it's always current."
— Head of Product at a mid-stage SaaS companyWhy WordPress for Your Docs Site
Confluence is an excellent writing tool. But as a public-facing documentation site, it has real limitations: you're on Atlassian's domain (not yours), SEO control is minimal, the design is fixed, and every reader needs an Atlassian account. For internal wikis, that's fine. For public product docs, it's a problem.
WordPress gives you what Confluence can't:
- Your own domain — docs live at
yourdomain.com/docs/, notyourteam.atlassian.net - Full design control — match your brand, choose your layout, style it however you want
- SEO ownership — every article contributes to your domain authority, not Atlassian's
- No login required for readers — public access without Atlassian licenses
- Integration with your website — same navigation, CTA flows, analytics, and tracking as the rest of your site
Your Options for a Docs Site
Before building, it's worth understanding your options and why the Confluence-to-WordPress approach wins for most product teams.
Confluence → WordPress (via plugin)
Write in Confluence. Publish automatically to WordPress via Content Publisher for Confluence.
Dedicated Docs Tools (GitBook, Notion, Readme)
Standalone documentation platforms with their own hosting.
Public Confluence Space
Set your Confluence space to public so anyone can access it.
Manual Copy-Paste to WordPress
Write in Confluence, manually copy content to WordPress pages.
Step 1: Plan Your Documentation Structure
Before touching the plugin, get your Confluence space organised. The structure you create in Confluence will map directly to your WordPress documentation site. A well-organised Confluence space means a well-organised public site.
Create a top-level space (e.g. "Product Docs"). Inside it, use parent pages as section headers: Getting Started, Core Features, Integrations, API Reference, Troubleshooting. Each parent page has child pages for individual topics.
In WordPress, this maps to a /docs/ parent page with child pages nested underneath. Your site navigation reflects the Confluence hierarchy, making it easy for users to find what they need.
Setting Up the Confluence-to-WordPress Pipeline
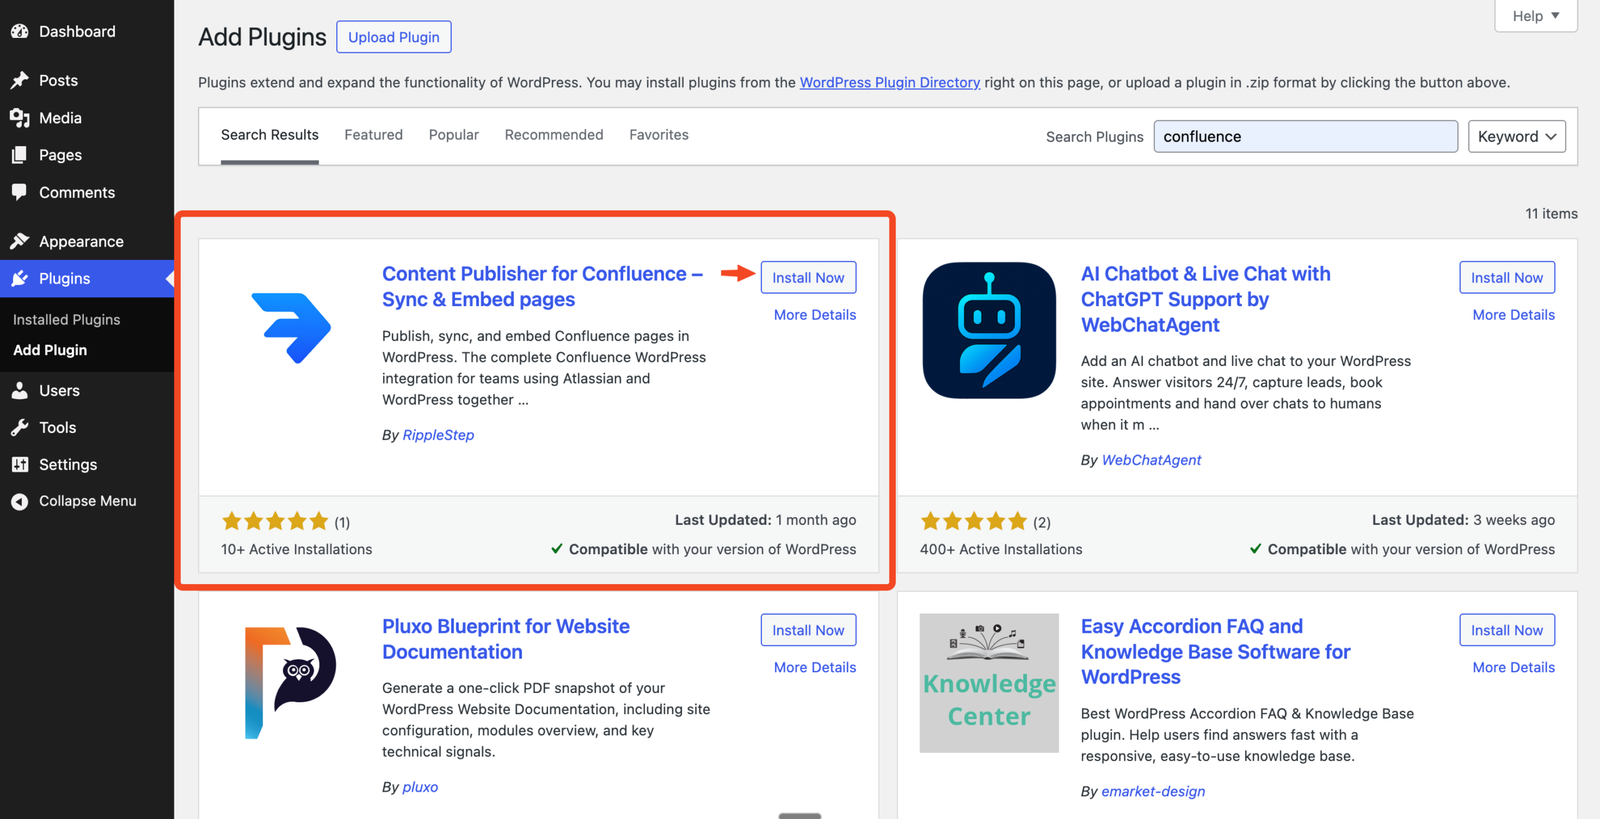
In WordPress, go to Plugins → Add New and search for Content Publisher for Confluence. Install and activate. The free plan supports up to 10 pages from a single space — enough to test the workflow before committing to Pro.
- Works on any self-hosted WordPress 5.8+
- No code, no custom development
- Compatible with all major WordPress themes and page builders
2.1 Open Atlassian account settings
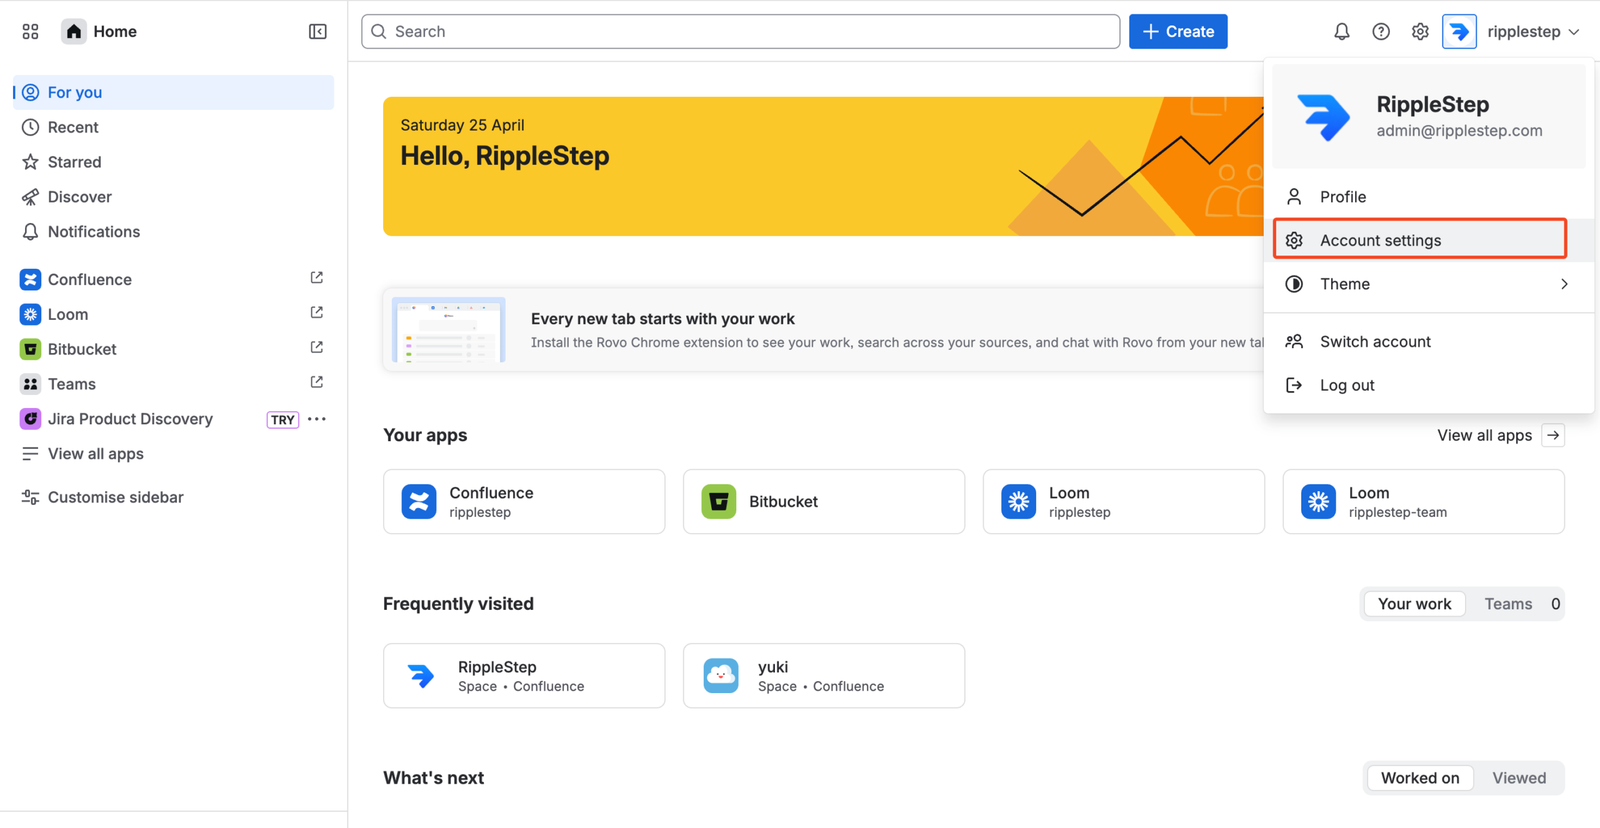
Log in to Atlassian, click your profile in the top-right, and open Account settings.
2.2 Go to Security and open API Tokens
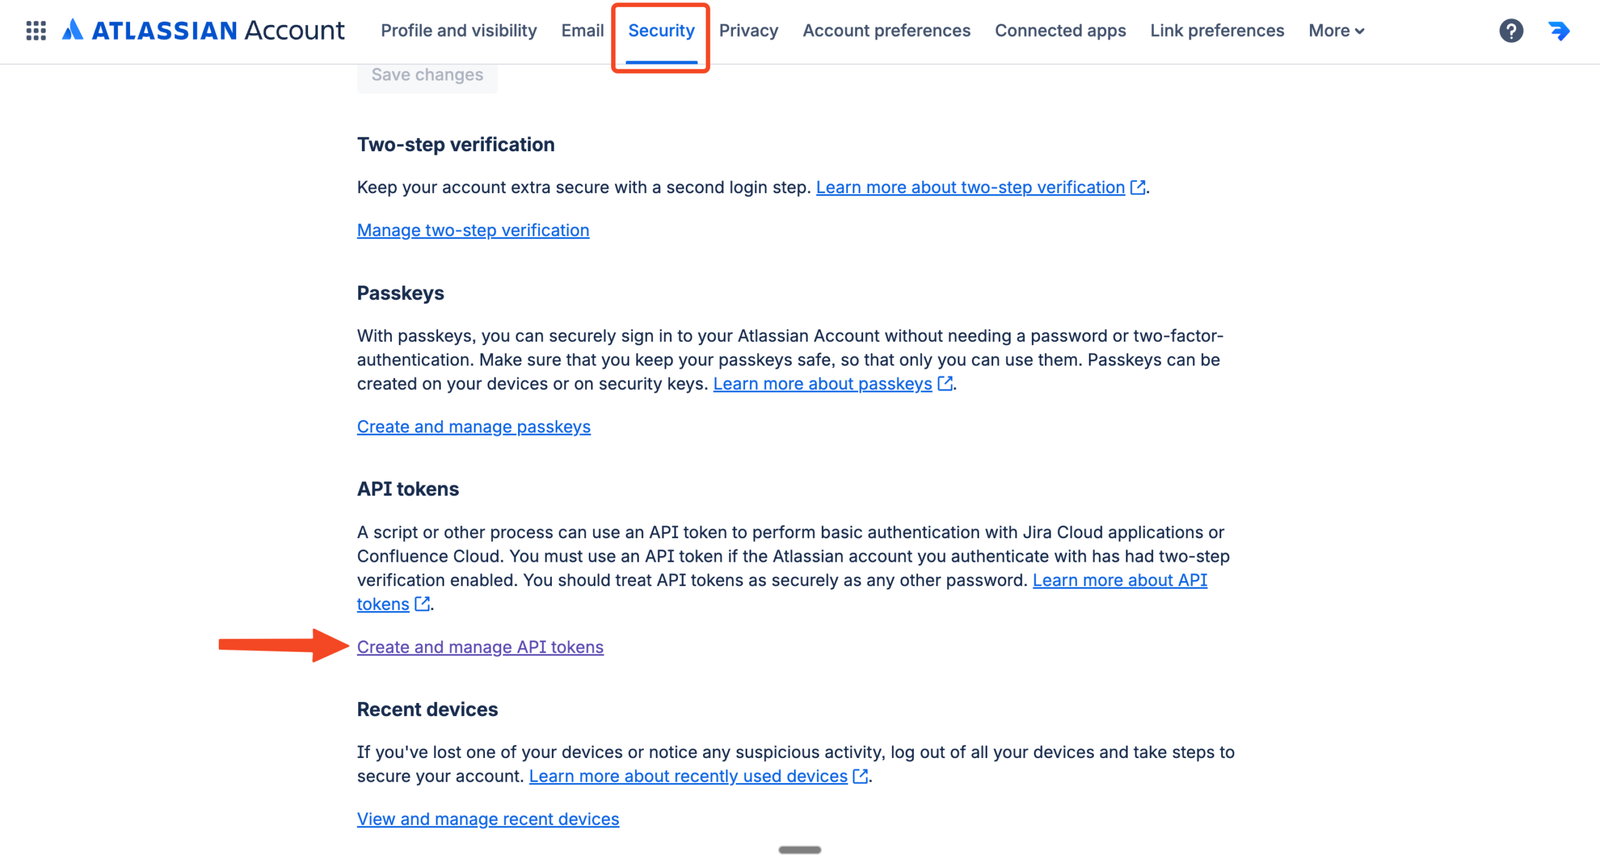
Inside your Atlassian account, open Security, find API tokens, and click Create or manage API tokens.
2.3 Create, label, and copy the token
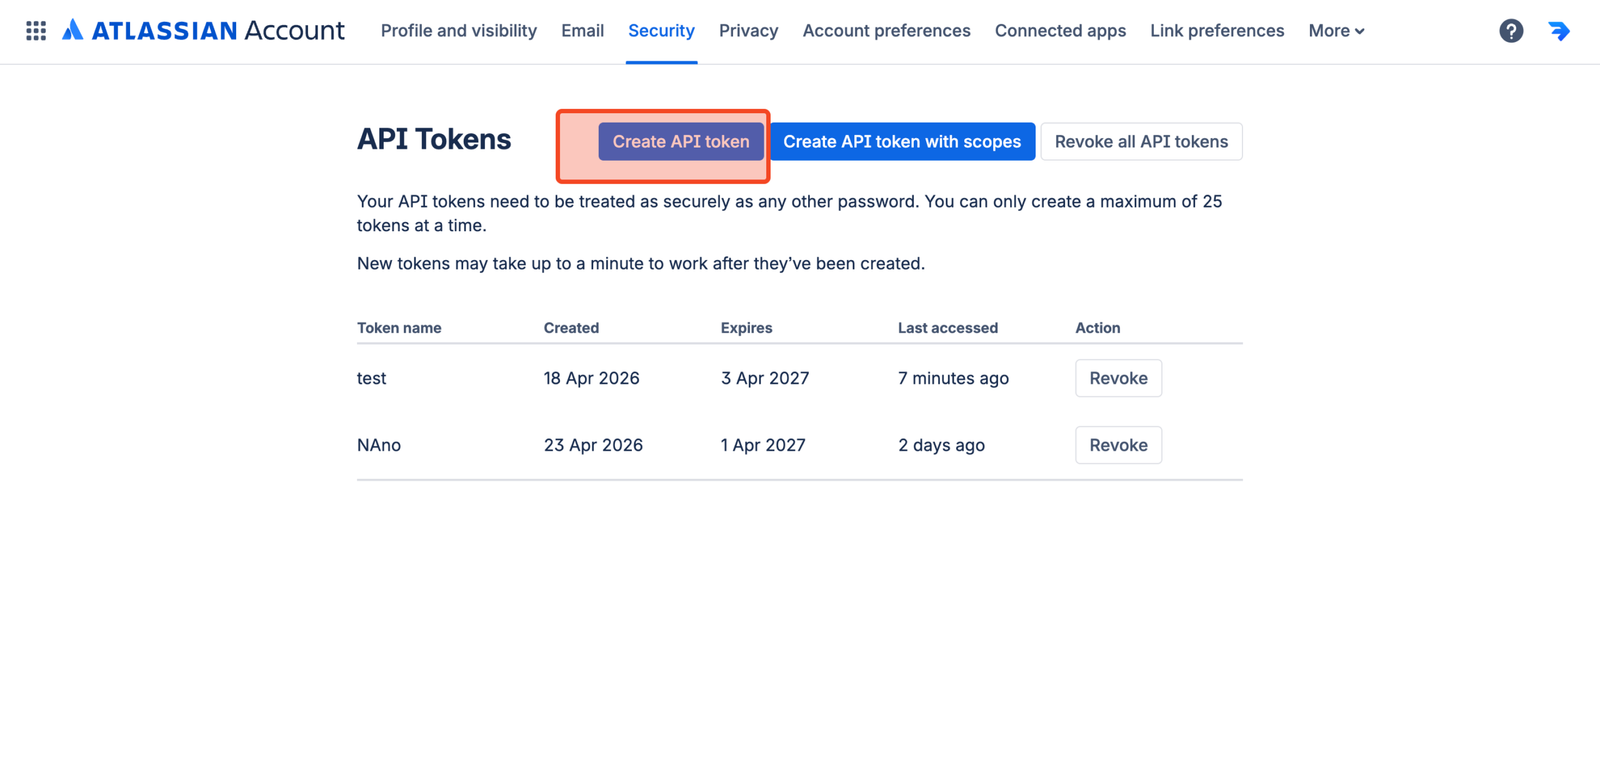
Name the token something like WordPress Docs Publisher, click Create, then copy the token immediately. Atlassian will only show it once.
- The token only needs read access to your Confluence space
- Revoke it any time from the same Atlassian settings page
- Store it in a password manager so your team can rotate credentials safely
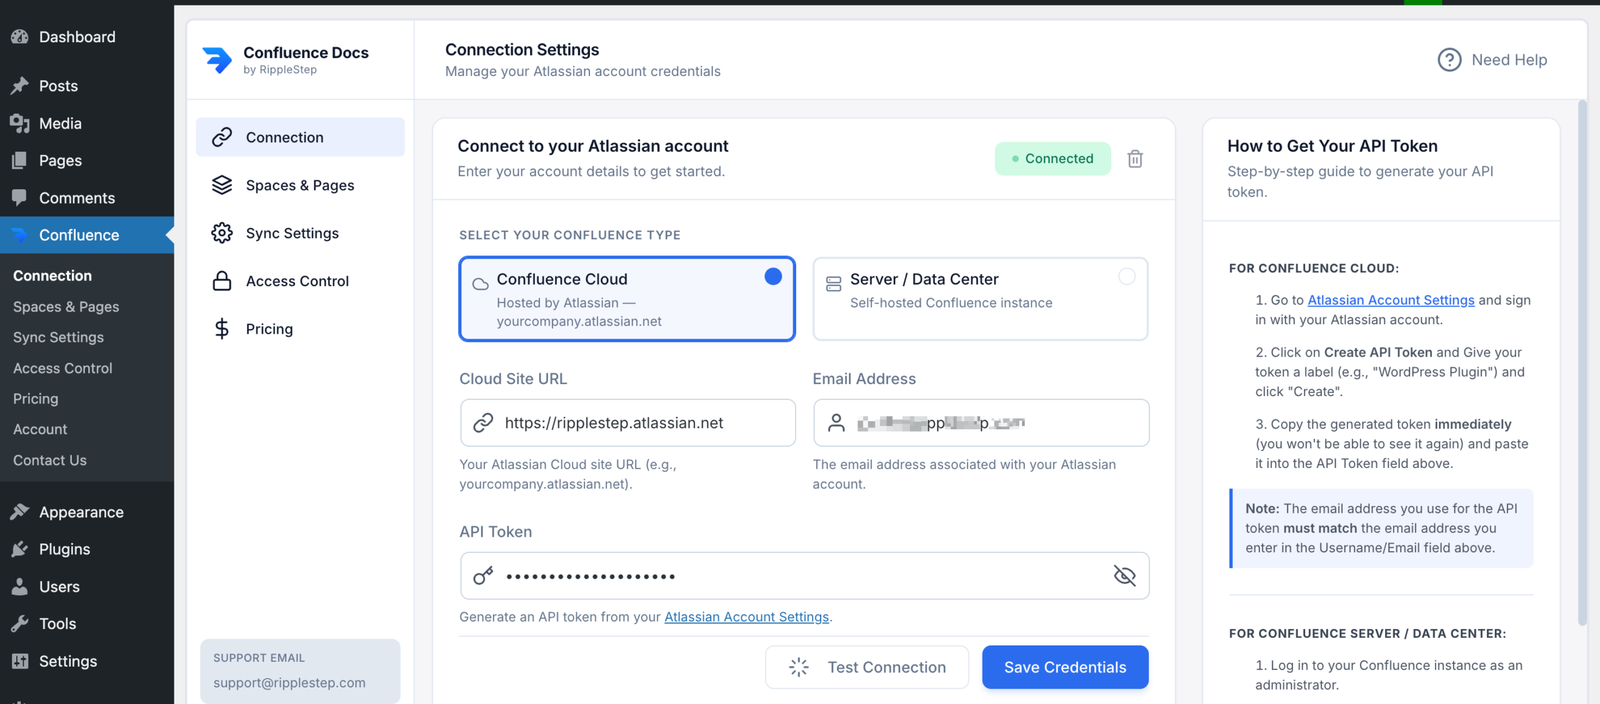
In WordPress, navigate to Content Publisher → Settings. Enter your Confluence site URL (e.g. yourcompany.atlassian.net), your Atlassian account email, and the API token. Click Save & Test Connection. A green success message confirms the connection.
Go to Content Publisher → Sync Configuration. Select your documentation space and choose the pages to publish. For a full docs site, you'll want to select all pages in the space — which requires the Pro plan if you have more than 10 pages.
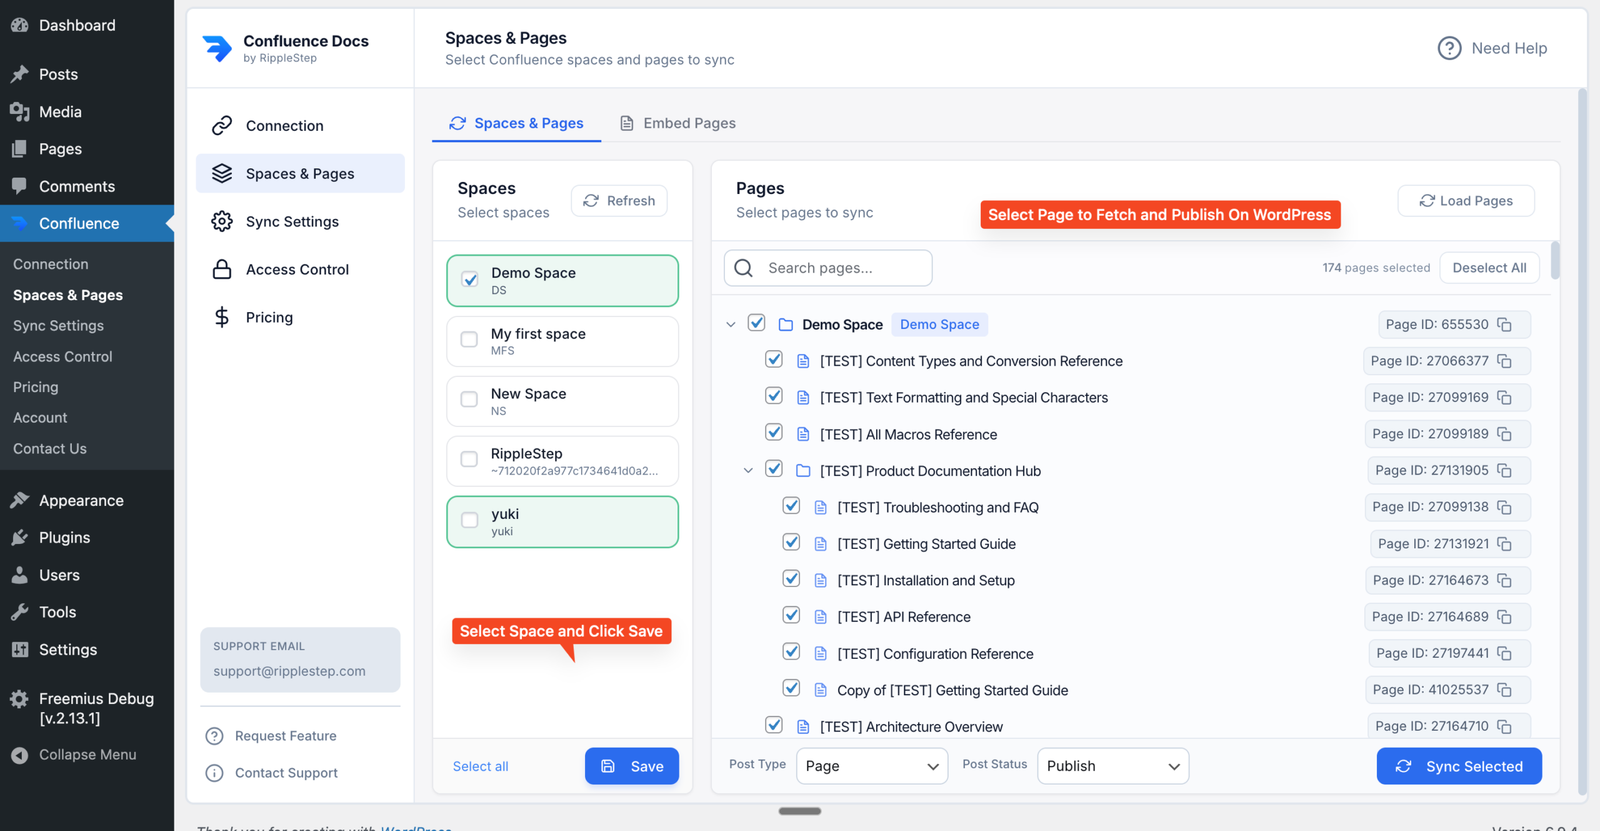
- Free: up to 10 pages from one space
- Pro: unlimited pages from unlimited spaces
- Exclude draft pages or work-in-progress content by leaving them unchecked
Click Sync Now. The plugin fetches all selected pages from Confluence, converts them to WordPress blocks, and creates them as WordPress pages. Depending on how many pages you're syncing, this may take a few seconds to a few minutes.
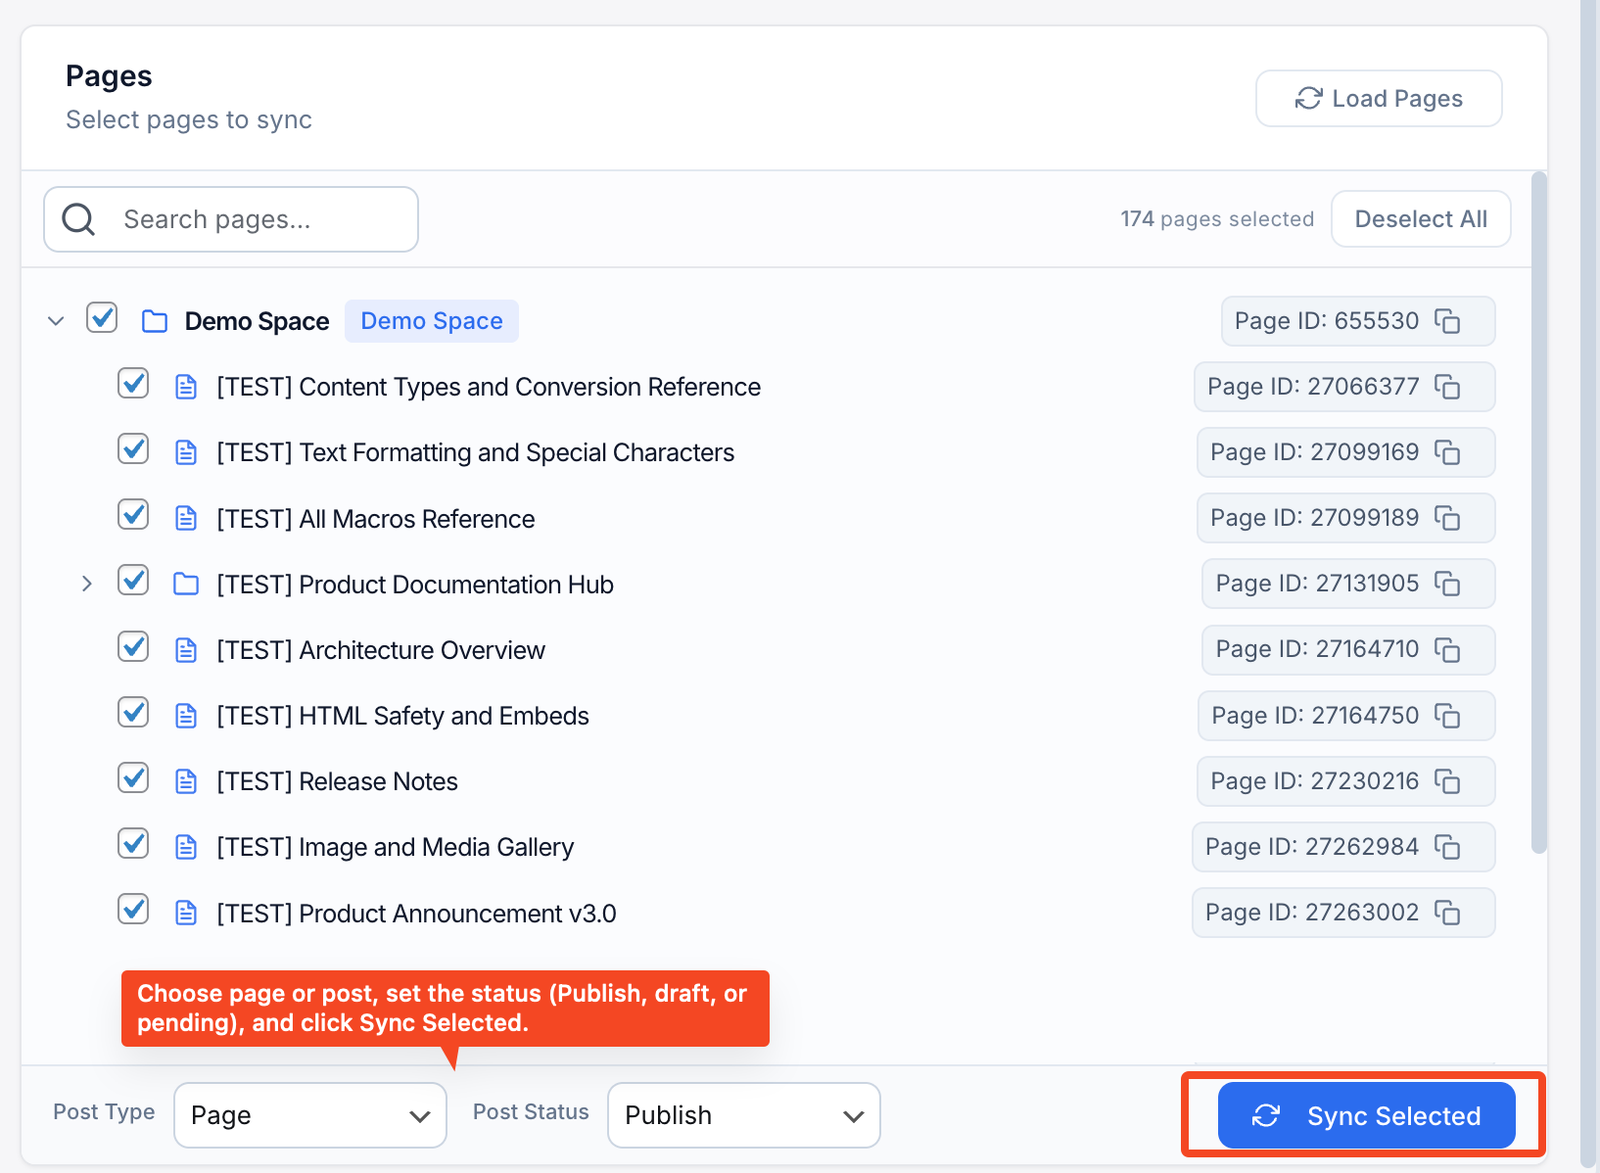
After the sync, go to Pages in your WordPress admin. You'll see all your Confluence documentation pages there, formatted and ready.
With the structure in place, the last piece is keeping it current. On the Pro plan, go to Content Publisher → Sync Settings and choose your automated sync schedule: every 15 minutes, hourly, every 6 hours, or daily.
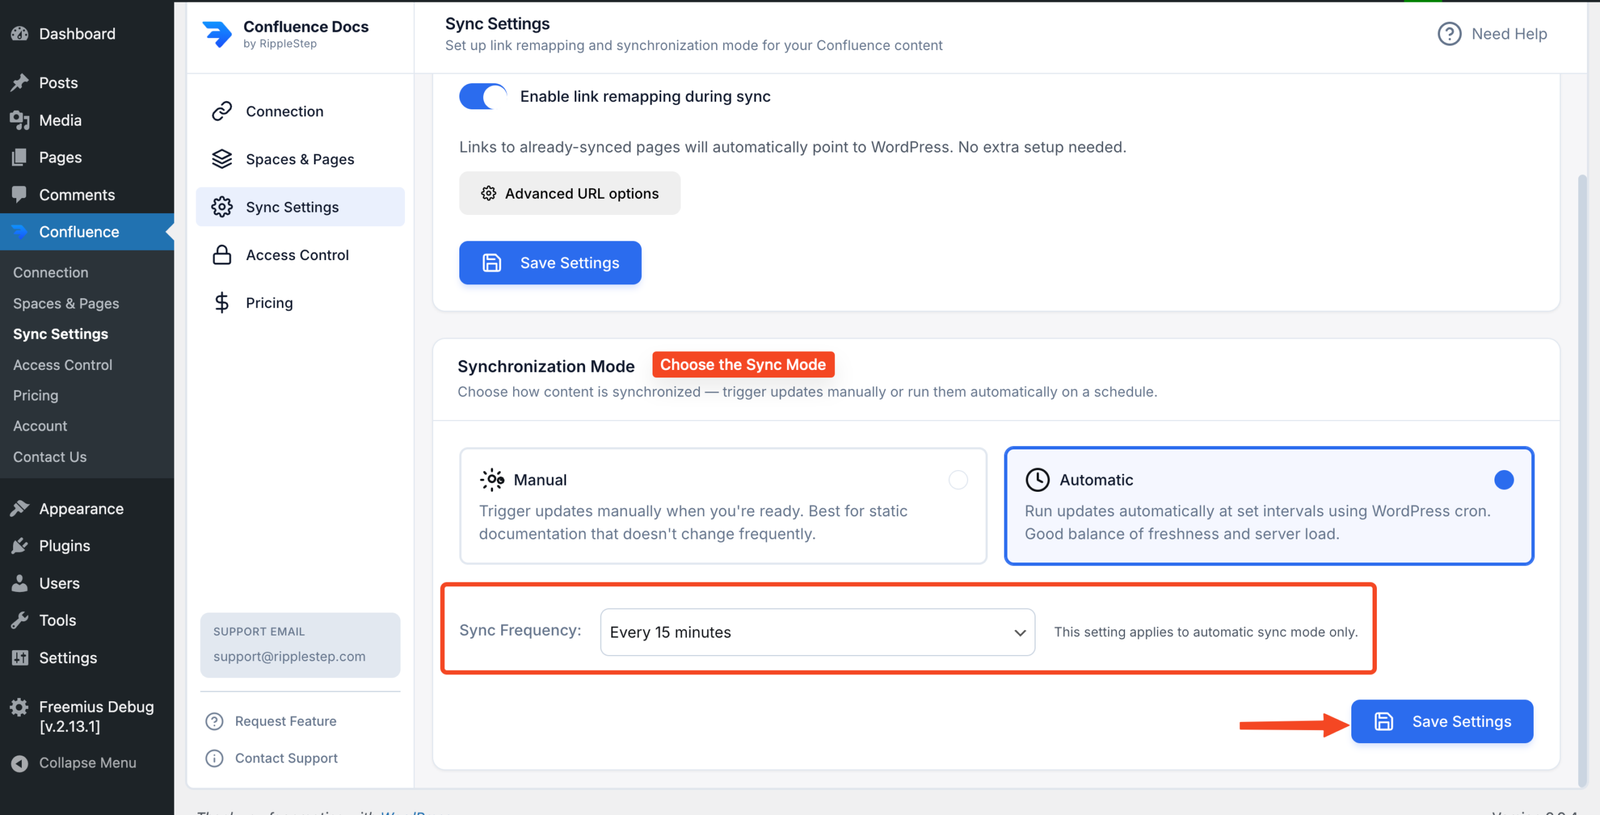
From this point on, whenever a writer updates a page in Confluence, your WordPress docs site picks up the change on the next scheduled sync — without anyone touching WordPress.
Making Your Docs Site SEO-Effective
A documentation site that ranks on Google is a support cost reducer and a user acquisition channel. Every article that answers a question searchers are already asking is a page that can bring in organic traffic. Here's how to set up your WordPress docs site for SEO:
| SEO Element | What to Do | WordPress Tool |
|---|---|---|
| Page titles | Match what users search for, not internal Confluence page names | Yoast SEO / Rank Math |
| Meta descriptions | Write a 150-character summary of what the doc covers | Yoast SEO / Rank Math |
| URL structure | Use clean slugs: /docs/getting-started/install | WordPress Permalinks |
| Internal linking | Link related articles to each other within the doc body | Manual in Confluence, carried over on sync |
| Structured data | Add TechArticle or HowTo schema to relevant pages | Schema Pro / manual |
| Site search | Add a search bar so users find answers without leaving your docs | Relevanssi or native WordPress search |
The SEO advantage of your own domain
- Every documentation page on
yourdomain.com/docs/builds your domain authority - Help articles that answer real user questions bring in free organic traffic
- Confluence on
atlassian.netgives you zero SEO benefit on your own domain - WordPress gives you full control over titles, meta, canonical URLs, and structured data
Public Docs vs Gated Docs: Controlling Access
Not everything in your documentation should be public. API credentials guides, internal implementation notes, or premium-tier feature docs might be restricted to logged-in users or specific account tiers. The Confluence-to-WordPress approach handles this cleanly.
Public Help Center
Getting started guides, FAQs, and feature overviews visible to everyone — no login required. Drives SEO and reduces support tickets.
Customer-Only Docs
Advanced configuration, integrations, or onboarding flows visible only to logged-in WordPress users. Keep these behind a free account gate.
Premium Tier Content
Enterprise feature documentation restricted to users with a specific WordPress role. Use per-page access control (Pro) to manage this granularly.
Internal Technical Docs
Architecture notes, deployment guides, and runbooks that should never be public. Leave these unsynced — they stay in Confluence only.
Build Your Product Docs Site Today
Install Content Publisher for Confluence free and sync up to 10 pages. Upgrade to Pro for your full documentation library — unlimited pages, automated sync, and per-page access control.
Install Content Publisher for Confluence Free →